wewent.to – Help
wewent.to lets you document journeys together with your travelmates using maps, GPS tracks, and photos. This guide explains how to create journeys, manage access, and add content.
Table of Contents
- 1. Journeys
- 2. Creating a Journey
- 3. Editing Journey Details
- 4. Privacy & Access Control
- 5. Roles & Permissions
- 6. Adding Photos and GPX Tracks
- 7. Importing from Google Drive
- 8. Editing Photo Descriptions
- 9. Viewing a Journey
- 10. Commenting & Replies
- 11. Reactions
- 12. Forking Journeys
- 13. Inviting Travelmates
- 14. Activity Feed & Notifications
- 15. Following & Profiles
- 16. Personal Tags
- 17. API Tokens
- 18. Connecting AI Agents via MCP
- 19. Manage Connected Apps
- 20. Manage Connected Accounts
1. Journeys
A journey lets you document your shared experience on land or sea, be that an Atlantic crossing or a walk in the park. It combines a map with photos and GPX tracks contributed by multiple users.
2. Creating a Journey
- Sign in to your wewent.to account.
- Open the Journeys page.
- Click the Create button.
- Enter a name and an optional description.
- Confirm to create the journey.
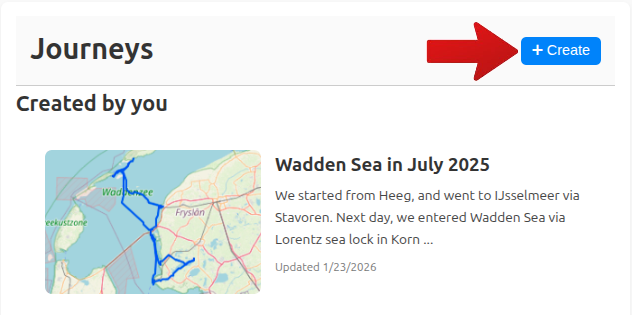
The user who creates a journey becomes its creator and controls its settings and access.
Automatic Location Labels
When you upload GPX tracks, the system automatically generates descriptive location labels (e.g., countries, regions, or mountain ranges) based on the journey's geography. These labels help you and others quickly identify where the journey took place.
As the journey creator, you can manually edit or refine these labels at any time from the journey page.
3. Editing Journey Details
The journey creator can edit:
- The journey name
- The journey description
- Location labels
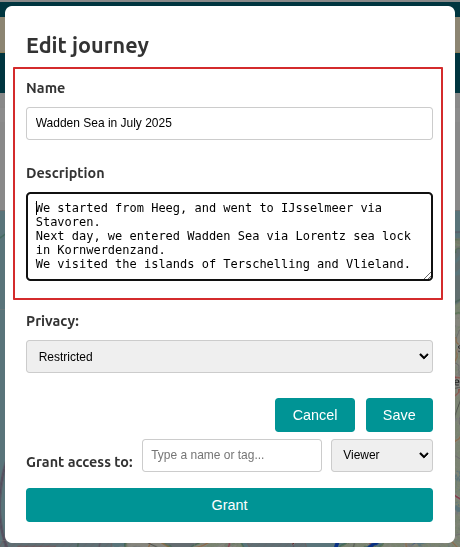
Changes are saved immediately and visible to everyone who has access to the journey.
4. Privacy & Access Control
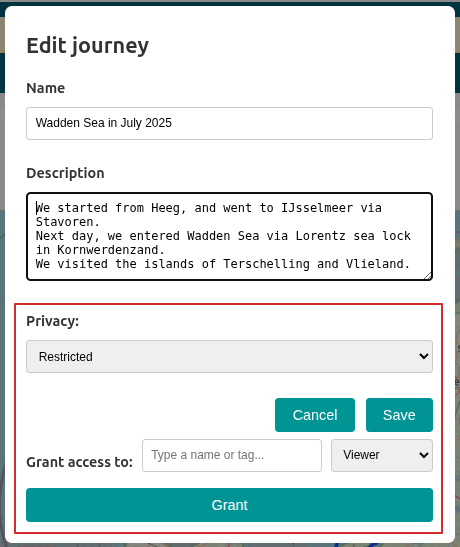
The creator of the journey manages the access rights to it. Only authorized users can add content to the journey. A journey can be either public or private.
Public Journeys
- Visible to anyone on wewent.to.
- Appear on the Explore page.
Non-Public Journeys
- Visible only to selected users.
- Not shown in public listings.
5. Roles & Permissions
- Creator – Full control over the journey, its content, and access.
- Contributor – Can add photos and GPX tracks.
- Viewer – Can view the journey but cannot add content.
6. Adding Photos and GPX tracks
- Open the journey.
- Click the Add button.
- Select one or more image and GPX files.
- Upload the files.
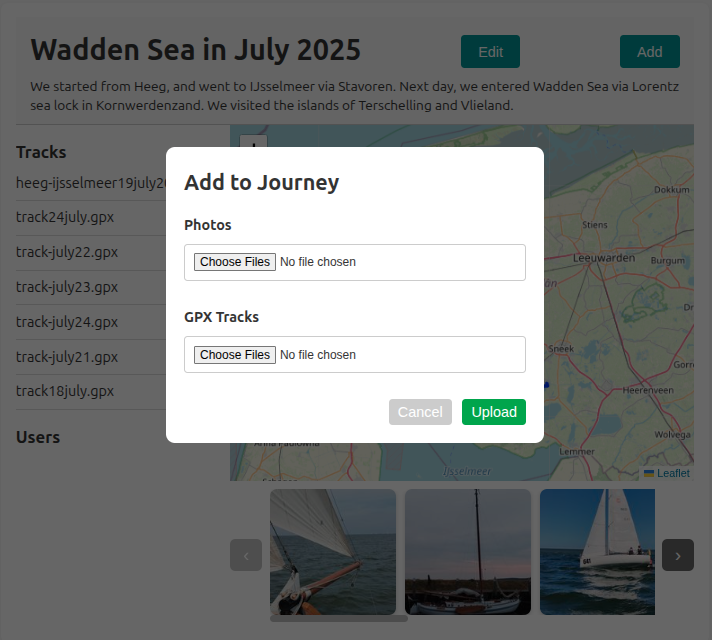
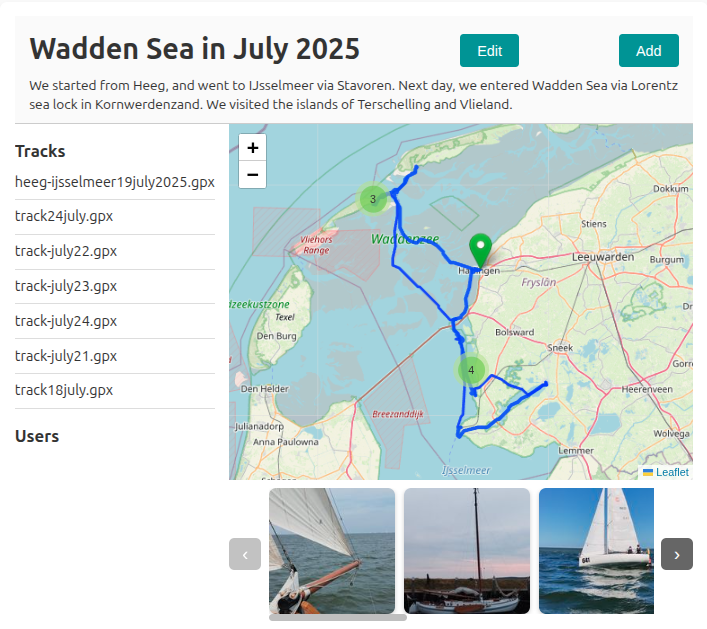
GPX tracks are displayed on the map; their names are listed next to the map.
Photos appear as thumbnails below the map and as markers on the map when GPS data is available.
Clicking a thumbnail opens a full size image. You can navigate between photos using the keyboard arrow keys or the Next and Previous buttons on either side of the image overlay.
7. Importing from Google Drive
Pick GPX tracks and photos directly from Google Drive instead of manual uploads. wewent.to only ever accesses the files you explicitly select in the Google Picker — never your whole Drive.
Connecting Google Drive
- Go to a journey you can contribute to (Creator or Contributor).
- Open Add media and click Choose files from Google Drive.
- A Google sign-in popup asks you to grant access to files you select with wewent.to (scope
drive.file). Optionally, you can also grantdrive.readonlyto enable thumbnail previews in the Picker's GRID view. - Grant permission. The consent screen no longer mentions reading all your Drive files.
Connecting once is enough: wewent.to keeps an encrypted access credential (not your files) so imports work without reconnecting every time. Manage it under Connected accounts: revoke there to disconnect Google completely. If access stops working (e.g. you revoked it at Google), the connection shows Reconnect required — reconnect and re-run the import; partial progress is kept. If you previously granted the old full-Drive read access, Google shows a scope change on next connect — this is expected.
Picking files
- Click Choose files from Google Drive. The Google Picker opens.
- By default, the Picker opens in GRID mode showing big image thumbnails. If you did not grant the
drive.readonlyscope (or uncheck Show thumbnails in the dialog), it falls back to LIST mode with small thumbnails. - Browse folders and multi-select the files to import. Folder selection itself is disabled — open a folder and pick the files inside it.
- Confirm the Picker selection. Files download and are added to your journey.
- The Picker shows all file types, but only GPX files and images can be imported by wewent.to.
Supported File Types
- Images: JPEG (.jpg, .jpeg), PNG (.png), HEIC (.heic), HEIF (.heif)
- Tracks: GPX files (.gpx, detected by extension even when Drive reports a generic MIME type)
Important Notes
- Maximum 50 files per import (enforced in the Picker and on the server).
- Individual files over 10 MB are skipped.
- Folders, Google-native documents (Docs, Sheets, Slides), shortcuts, trashed files, unsupported types, and files you can no longer access are skipped with a per-reason breakdown — the rest of the batch still imports.
- Selecting the same file twice in one import counts once (duplicates are deduped). Files already imported earlier are imported again — there is no cross-import dedupe.
- Your Google account must have access to each selected file. If a file was trashed or unshared after picking, it is reported as trashed or inaccessible without failing the batch.
- If the import reports an expired token, reconnect (popup or Connected accounts page) and re-run it — already imported files are kept.
- If the Google script fails to load (offline, blocked, ad blocker) the Picker button shows an error and the rest of the Add-media dialog still works. Popup blockers and in-app mobile browsers can break the sign-in or Picker popups — allow popups for this site and retry.
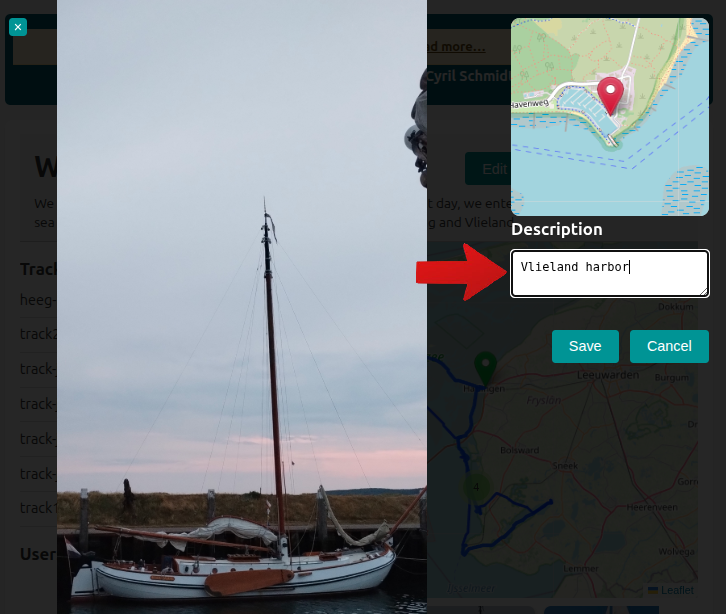
8. Editing Photo Descriptions
Users can edit the descriptions of photos they uploaded themselves.
9. Viewing a Journey
- Explore photos and tracks on an interactive map.
- Browse photos via thumbnails and full-size overlays.
- Follow the geographical story of the journey.
10. Commenting & Replies
You can engage with journey content through comments and replies. Comments can be added to journeys and individual photos.
Adding Comments
- Journey Comments: Scroll to the bottom of any journey page and use the comment form to share your thoughts about the journey.
- Photo Comments: Open a photo in full view and add comments directly on the image to discuss specific moments.
Threaded Replies
Comments support nested replies, allowing for threaded conversations:
- Click the Reply button under any comment to respond directly.
- Your reply will appear indented below the original comment.
- You cannot reply to a reply — keep conversations organized by replying to the top-level comment.
Editing and Deleting Comments
- Edit: Click the Edit button on your own comments to modify the text.
- Delete: Use the Delete button to remove your comments. Comments with replies will be soft-deleted (hidden but preserved for context).
Guest Interaction: If you are a guest viewing a public journey, you can log in or register directly through a modal window by clicking the Log in to comment button. This allows you to join the conversation without losing your place on the page.
11. Reactions
Reactions let you quickly show appreciation or engagement with journey content using emojis.
Available Reactions
Click the reaction buttons to add your response:
- 👍 Like – Show appreciation or agreement
- 😄 Haha – Indicate something is funny or amusing
- 😢 Sad – Express sympathy or sadness
- 😠 Angry – Show disagreement or frustration
Where You Can React
- Journeys: React at the top of any journey page.
- Photos: Open a photo and react using the buttons below the image.
- Comments: React to individual comments on photos and journeys.
Managing Your Reactions
- Clicking the same reaction again removes it.
- Clicking a different reaction type replaces your previous reaction.
Guest Interaction: Guests can log in or register via a modal when attempting to react to content, allowing them to participate seamlessly.
12. Forking Journeys
Forking creates your own editable copy of a public journey, useful for building on someone else's adventure or starting fresh with existing tracks.
How to Fork a Journey
- Browse public journeys on the Explore page.
- Open the journey you want to fork.
- Click the Fork button (usually near the journey title).
- A new journey is created with all GPX tracks copied to your account.
What Gets Forked
- All GPX tracks are cloned into your new journey.
- The journey name and description are copied.
- Your forked journey starts with private visibility (restricted access).
- Photos are not copied – you can add your own photos to the tracks.
13. Inviting Travelmates
Share private journeys with friends by inviting them to become viewers or contributors.
Sending an Invitation
- Open your journey.
- Click Invite in the button bar.
- Enter the invitee's email address.
- Select their role: Viewer (can view only) or Contributor (can add content).
- Add a personal message. This is not mandatory, but recommended. It greatly reduces the chances that your invitation will be mistaken for spam.
- Click Send Invitation.
Guest Access vs. Registered User
- Guest Access: The invitation link allows access without an account initially. Guests can view the journey but must create an account to add content.
- Registered Contributor: When an invited user registers with the same email, they become a full contributor with the role you assigned.
Managing Invitations
- Invitations are sent via email with a unique link.
- The invite link expires after seven days.
- Only the journey creator can send invitations.
- No more than 10 invitations per hour per user are allowed.
14. Activity Feed & Notifications
The Feed page keeps you updated on the latest activity across the wewent.to community and your social circle.
Notifications You'll Receive
- New Followers: When another user starts following you.
- Content Added: When someone adds photos or tracks to a journey you have access to.
- Comment Replies: When someone responds to one of your comments.
- Social Activity: When users you follow create new public journeys or contribute to others.
- Access Changes: When you are granted or revoked access to a private journey.
Notifications are displayed in reverse chronological order, allowing you to quickly jump to the relevant journey or profile.
15. Following & Profiles
Connect with other travelers through the People directory and personal Profiles.
The People Directory
The People page lists all registered users. You can browse their avatars, usernames, and optional personal tags or descriptions.
User Profiles
Clicking on a user in the directory opens their public profile. Here you can see:
- Their identity details (username, tag, and bio).
- A list of all their journeys that you are permitted to view.
Following Users
You can Follow other users from their profile page. Following a user ensures their new public journeys and contributions appear in your Activity Feed. You can unfollow at any time.
16. Personal Tags
Organize journeys for your own discovery using Personal Tags.
How Personal Tags Work
- Private by Design: Tags you add to a journey are only visible to you. Other users, including the journey creator, cannot see your personal tags.
- Universal Access: You can add your own tags to any journey you have permission to view, even if you aren't a contributor.
- Easy Organization: Use tags to categorize journeys by theme (e.g., "hiking", "sailing", "2024-plans") for easy filtering on the Explore and Journeys pages.
Adding and Editing Tags
- Open any journey you can view.
- Locate the tag section beneath the journey title.
- Click to add or edit tags. Your changes are saved privately to your account.
17. API Tokens
API tokens (personal access tokens) let external tools – such as AI assistants – act on your behalf through the
wewent.to API. Each token starts with wwt_pat_ and carries its own set of permissions, so you decide
exactly what a connected tool may see and do.
Creating a Token
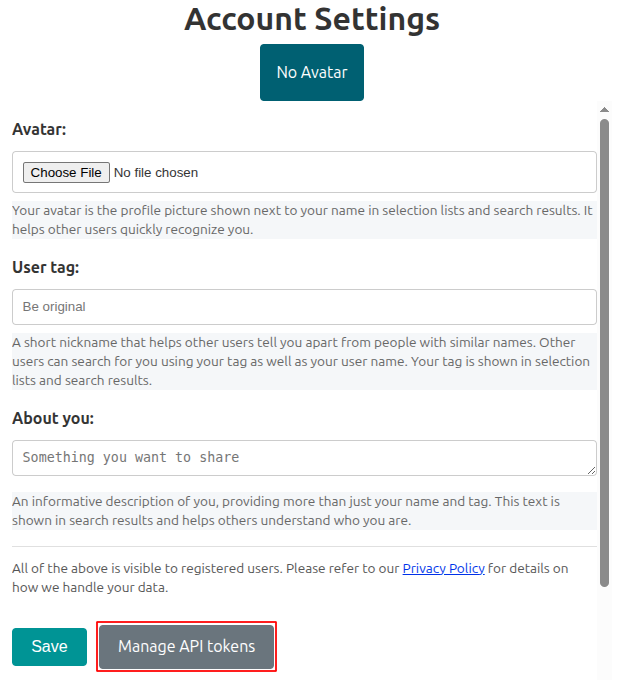
- Sign in and open your Account Settings.
- Click the Manage API tokens button.
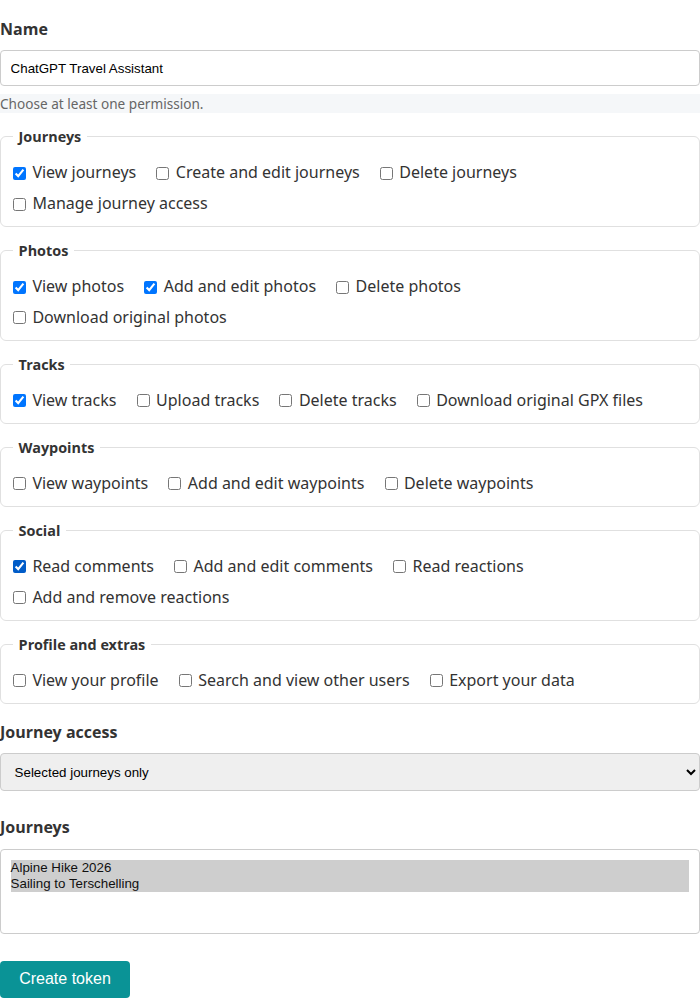
- Enter a descriptive name (e.g., ChatGPT Travel Assistant) so you can later recognize what the token is used for.
- Select at least one permission. Permissions are grouped by area: Journeys, Photos, Tracks, Waypoints, Social, and Profile and extras. Grant only what the tool actually needs.
- Choose the journey access: All journeys I can access, or Selected journeys only and pick the journeys from the list.
- Click Create token.
The API Tokens page lists your existing tokens and, below them, the form for creating a new one:
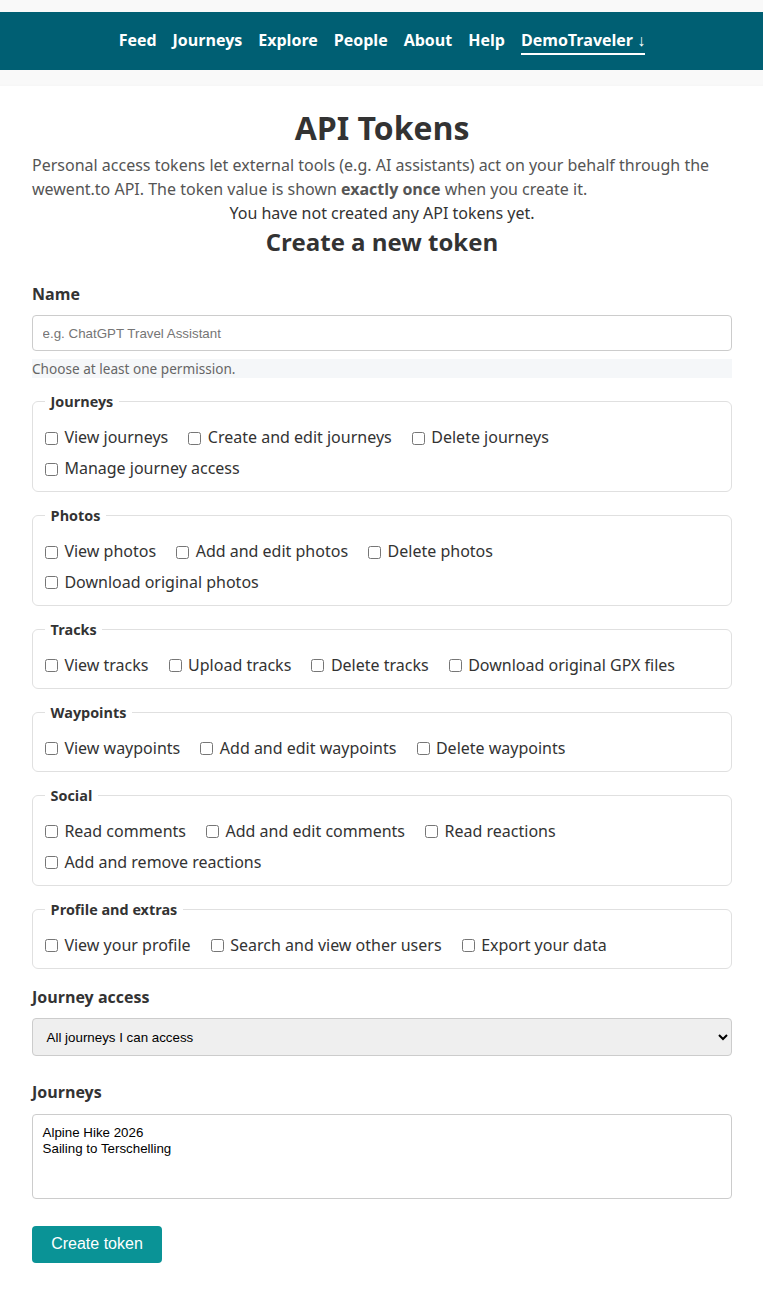
The following example sets up a read-mostly assistant: it may view journeys, photos and tracks, add photos, and read comments – but only for two selected journeys.
The One-Time Token Value
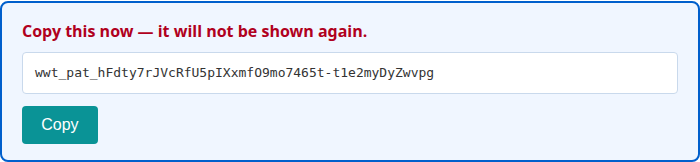
After creation, the full token value is displayed in a highlighted box. Copy it immediately – it is shown exactly once and cannot be retrieved later, neither by you nor by wewent.to. If you lose it, simply create a new token.
Managing Existing Tokens
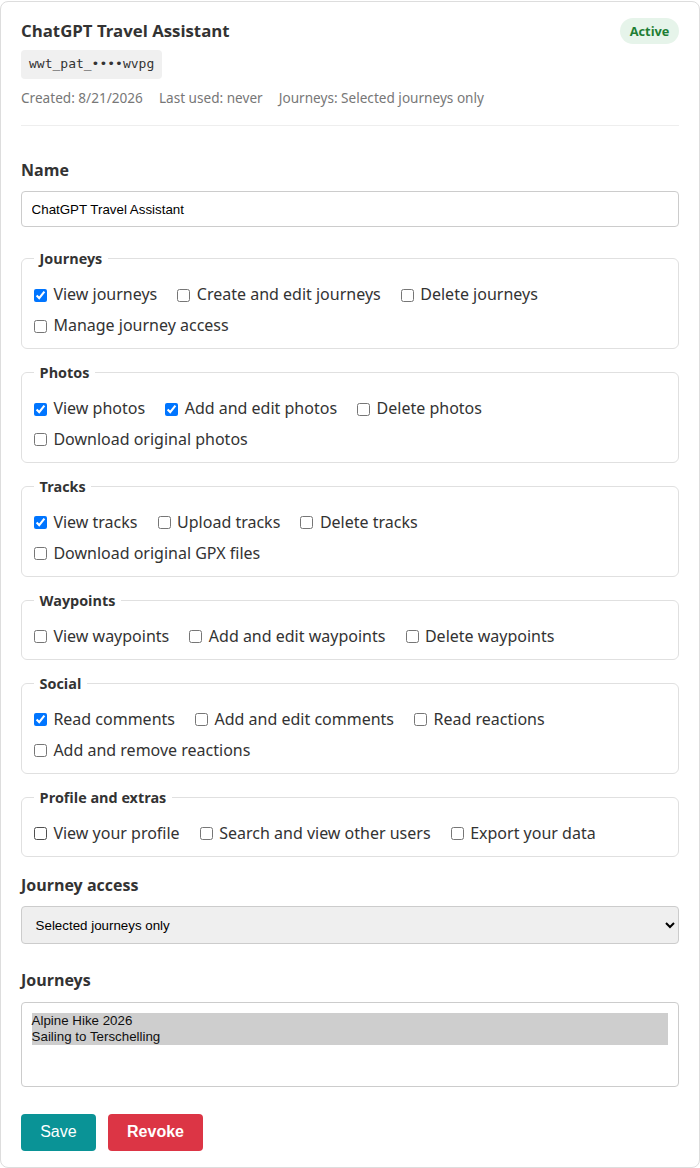
- Each token card shows its masked value (
wwt_pat_••••followed by the last four characters), the Created and Last used dates, the journey scope, and a status pill (Active or Revoked). - You can rename a token or change its permissions and journey access at any time, then save your changes.
- Revoke immediately and permanently invalidates a token. Revoking never affects your browser sessions or your account.
- Revoked tokens remain in the list, greyed out, for reference. They cannot be re-activated.
18. Connecting AI Agents via MCP
Upon your explicit permission, the wewent.to MCP (Model Context Protocol) server lets authorized AI agents — such as Claude, ChatGPT, OpenCode, OpenHands, Cursor, GitHub Copilot, Zed, Goose, Cline, LM Studio, Devin and others — read and write your travel data: journeys, GPS tracks, photos, waypoints, comments, and reactions.
The agent never gets your password. Instead you create a Personal Access Token (PAT) or approve an OAuth 2.1 consent screen. Both credentials are scoped by three independent layers:
- PAT scopes / OAuth scopes — which kinds of data the token may touch (e.g.
journeys:read,photos:write) - Your journey role — Creator / Contributor / Viewer (same permission engine as the web UI)
- Journey restriction — optional allow-list: All journeys I can access or Selected journeys only
Effective permission is defined by all three: the scope, your role (creator, contributor or viewer) and journey restriction.
Quick Start (PAT — works with most agents)
- Sign in to wewent.to and open Account Settings → Manage API tokens.
- Click Create token.
- Name it (e.g. Claude Travel Assistant).
- Pick the scopes the agent needs (see the Scope Catalogue below).
- Choose Journey access: All journeys I can access or Selected journeys only.
- Click Create token → copy the value immediately (
wwt_pat_…— shown once only). - In your AI agent, add a custom MCP connector pointing at:
https://wewent.to/api/mcp
with headerAuthorization: Bearer. - Test with a simple prompt: “List my journeys”.
Free vs. Paid Tiers
The table below shows which agents offer MCP on a free tier. All agents listed support Bearer PAT; those marked OAuth also support the OAuth 2.1 flow (required for claude.ai, ChatGPT custom connectors, and the Claude mobile apps).
| Agent | Free tier | PAT (Bearer) | OAuth 2.1 |
|---|---|---|---|
| Claude (web, desktop, mobile) | ✅ Only one custom connector in the free tier | ✅ | ✅ |
| ChatGPT | ✅ | ✅ | |
| Gemini | ✅ | ✅ | |
| Mistral Le Chat | ✅ | ✅ | ✅ Auto-detects sign-in method |
| VS Code + GitHub Copilot Free | ✅ MCP on Copilot Free | ✅ | ✅ |
| Codex CLI / app | ✅ Limited Codex on ChatGPT Free | ✅ | ✅ |
| Goose | ✅ | ✅ | ✅ |
| Cline | ✅ | ✅ | ✅ |
| Zed | ✅ | ✅ | ✅ Setting Authorization header disables OAuth |
| LM Studio | ✅ | ✅ | ✅ |
| Devin Desktop (formerly Windsurf) | ✅ Small quota | ✅ | ✅ |
| Cursor | Pro/Business only | ✅ | ✅ |
Key distinction:
• PAT = you paste wwt_pat_… into the agent’s “Bearer token” / “Request header” field.
• OAuth 2.1 = the agent redirects you to wewent.to, you approve scopes + journey restriction on a consent screen, the agent receives wwt_oat_… (1 h access token) + wwt_ort_… (30-day rotating refresh token).
Claude (web / desktop / mobile)
Free plan: one custom connector.
PAT method (simplest)
- In Claude → Settings → Connectors → Add custom connector.
- Name:
wewent.to
URL:https://wewent.to/api/mcp
Auth type: Bearer token
Header:Authorization: Bearer wwt_pat_…(paste your PAT). - Save → enable the connector.
OAuth method (required for claude.ai & mobile apps)
- In Claude → Settings → Connectors → Add custom connector.
- Name:
wewent.to
URL:https://wewent.to/api/mcp
Auth type: OAuth 2.1
Client registration: choose “Register automatically” (do not use the recommended default). - Save → Claude will open wewent.to consent screen → approve scopes + journey restriction.
- Done — token refresh is automatic.
ChatGPT
Only OAuth 2.1 — no raw Bearer field.
- ChatGPT → Plugins → Add → Add custom MCP server.
- Name:
wewent.to
Description:Group travel diary
Connection:https://wewent.to/api/mcp
Authentication: OAuth
Auth type: OAuth 2.1. - ChatGPT performs Dynamic Client Registration (DCR) → redirects to
https://wewent.to/oauth/authorize. - Sign in to wewent.to if needed → approve scopes + journey restriction → Allow.
- ChatGPT stores the rotating token pair; you never see the raw token.
Gemini
Only OAuth 2.1 — no raw Bearer field.
- Gemini → Customize → Connectors → +Custom.
- MCP Server URL:
https://wewent.to/api/mcp - Gemini performs Dynamic Client Registration (DCR) → redirects to
https://wewent.to/oauth/authorize. - Sign in to wewent.to if needed → approve scopes + journey restriction → Allow.
- Gemini stores the rotating token pair; you never see the raw token.
Codex CLI / App
Free tier includes limited Codex.
PAT
export CODEX_MCP_WEWENT_TO_TOKEN="wwt_pat_..."
codex mcp add wewent.to https://wewent.to/api/mcp
OAuth
codex mcp login wewent.to https://wewent.to/api/mcp
# Opens browser → approve on wewent.to consent screen
OpenCode
OpenCode uses a local config file. Create ~/.config/opencode/mcp.json:
{
  "mcpServers": {
    "wewent.to": {
      "url": "https://wewent.to/api/mcp",
      "headers": { "Authorization": "Bearer wwt_pat_..." }
    }
  }
}
Restart OpenCode. The server will appear in /mcp command output.
OpenHands
OpenHands reads MCP config from .openhands/mcp.json in your project or ~/.openhands/mcp.json:
{
  "mcpServers": {
    "wewent.to": {
      "url": "https://wewent.to/api/mcp",
      "headers": { "Authorization": "Bearer wwt_pat_..." }
    }
  }
}
Restart the OpenHands agent.
Mistral Le Chat
Mistral Le Chat supports custom connectors via its settings. Add a new connector with URL https://wewent.to/api/mcp and the PAT in the Authorization header. OAuth 2.1 is also supported and auto-detects the sign-in method.
VS Code + GitHub Copilot Free
In VS Code with GitHub Copilot Free, add the MCP server in your settings.json:
{
  "mcp": {
    "servers": {
      "wewent.to": {
        "url": "https://wewent.to/api/mcp",
        "headers": { "Authorization": "Bearer wwt_pat_..." }
      }
    }
  }
}
Or use the Copilot Chat interface to add the connector. Callback URLs are HTTPS or localhost (accepted by wewent.to).
Goose
Goose accepts a JSON config file. Add the server with URL https://wewent.to/api/mcp and the PAT in the Authorization header. OAuth 2.1 is also supported.
Cline
Cline uses a JSON config. Set "type": "streamableHttp" in your config:
{
  "mcpServers": {
    "wewent.to": {
      "type": "streamableHttp",
      "url": "https://wewent.to/api/mcp",
      "headers": { "Authorization": "Bearer wwt_pat_..." }
    }
  }
}
Zed
Zed accepts a JSON config with url + headers (PAT) or auth: { type: "oauth2" } (OAuth). Note: setting an Authorization header turns OAuth off.
LM Studio
LM Studio supports MCP servers in its configuration. Add https://wewent.to/api/mcp with the PAT in the Authorization header. OAuth 2.1 is also supported.
Devin Desktop (formerly Windsurf)
Devin accepts MCP configuration with URL https://wewent.to/api/mcp and the PAT in the Authorization header. OAuth 2.1 is also supported.
Cursor
Cursor (Pro/Business) supports MCP servers. Add the connector with URL https://wewent.to/api/mcp and the PAT in the Authorization header. OAuth 2.1 is also supported.
Other Agents
The agents above all accept a JSON config with url + headers (PAT) or auth: { type: "oauth2" } (OAuth). Consult each agent's documentation for the exact file location; the values are identical to the examples above.
Scope Catalogue — What Each Permission Allows
| Scope | Allows | Typical use-case |
|---|---|---|
profile:read | Your own profile (email, avatar, tags) | “Who am I?” |
journeys:read | List / retrieve journeys you can view | “Show my trips” |
journeys:write | Create / edit journey metadata | “New trip: Iceland 2026” |
journeys:delete | Soft-delete a journey | “Remove that test journey” |
journeys:share | Grant / revoke / change access | “Add Alice as contributor” |
photos:read | Photo metadata + thumbnails | “Show photos from journey X” |
photos:read_original | Download full-resolution originals | “Export hi-res images” |
photos:write | Upload, caption, attach to waypoints | “Add these sunset photos” |
photos:delete | Delete photos | “Remove blurry shots” |
tracks:read | Track metadata + geometry summary | “What’s the distance?” |
tracks:read_original | Download original .gpx | “Export to Garmin” |
tracks:write | Upload GPX tracks | “Import my watch track” |
tracks:delete | Delete tracks | “Remove duplicate track” |
waypoints:read | Read waypoints | “List anchorages” |
waypoints:write | Add / edit waypoints (planned) | — |
waypoints:delete | Delete waypoints (planned) | — |
comments:read | Read comments & replies | “What did Bob say?” |
comments:write | Add / edit comments (planned) | — |
reactions:read | Read reaction counts | “How many 👍?” |
reactions:write | Add / remove reactions (planned) | — |
users:read | Search / view other users (where UI permits) | “Find @alps23” |
export:read | Export aggregated journey data | “Give me my 2025 stats” |
Rule of thumb: grant the minimum scopes the agent needs. A read-only travel assistant only needs profile:read, journeys:read, photos:read, tracks:read, comments:read, reactions:read.
Available Tools (What the Agent Can Actually Do)
Read Tools (shipped)
| Tool | Description | Required scope(s) |
|---|---|---|
search_journeys | Filtered, paginated journey list (200 max) | journeys:read |
get_journey | Single journey enriched summary | journeys:read |
get_journey_timeline | Combined tracks/waypoints in timeline order | journeys:read |
get_journey_contributors | Contributor user IDs for a journey | journeys:read |
search_tracks | Filtered track list with GPX URL refs | tracks:read |
search_waypoints | Filtered waypoint list | waypoints:read |
get_waypoint | Single waypoint enriched summary | waypoints:read |
list_photos | Journey-scoped photo list with URL refs | photos:read |
search_photos | Cross-journey photo search (incl. proximity) | photos:read |
get_binary_resource | Download bytes for any /uploads/… URL | varies by URL class |
get_profile | Your own profile (private fields included) | profile:read |
get_user | Public profile of another user | users:read |
get_gdrive_connection_status | Check your Google Drive link status | (none — self-scoped) |
list_comments | Journey comments (top-level, with replies) | comments:read |
get_reactions | Aggregated journey reactions | reactions:read |
Write Tools (shipped)
| Tool | Description | Required scope(s) |
|---|---|---|
create_journey | New journey (name, description, privacy) | journeys:write |
update_journey | Edit name, description, privacy, tags, labels | journeys:write |
delete_journey | Soft-delete a journey | journeys:delete |
grant_access / revoke_access / update_role | Manage journey collaborators | journeys:share |
upload_photos | Base64 image upload (max 10 MB, 50 files) | photos:write |
upload_tracks | Base64 GPX upload | tracks:write |
remove_photos / remove_tracks | Delete media | photos:delete / tracks:delete |
set_image_caption / set_track_caption | Update captions | photos:write / tracks:write |
prepare_upload / get_upload_status | Capability-URL upload (large batches) | photos:write / tracks:write |
import_gdrive_files | Import from your linked Google Drive | photos:write + tracks:write |
Planned (not yet implemented): create_waypoint, update_waypoint, delete_waypoint, attach_images_to_waypoint, add_comment, add_reply, add_reaction, remove_reaction.
Security Best Practices
- Treat PATs like passwords — store in a secret manager, never post online or disclose to other people.
- Use journey restriction — limit tokens to only the journeys the agent needs.
- Revoke unused tokens —
/account/tokens→ Revoke. - Rotate periodically — create new, revoke old.
- Prefer OAuth for long-lived integrations — refresh tokens rotate automatically; PATs are static.
- Monitor “Last used” on
/account/tokensto detect stale tokens.
Troubleshooting
| Symptom | Likely cause | Fix |
|---|---|---|
| “Unauthorized” on first call | PAT typo / revoked / legacy PAT without lookup hash | Regenerate token at /account/tokens |
| “Forbidden: token lacks required scope ‘X’” | Scope not granted on token | Edit token → add scope → save |
| “Journey not found or access denied” | Journey is private / you’re only a viewer / PAT restricted to other journeys | Adjust journey restriction or grant contributor role |
| OAuth consent screen never appears | Connector didn’t register automatically / redirect URI mismatch | In Claude: pick “Register automatically”; ensure redirect URI is exact |
| Large upload fails | Base64 payload > 50 MB limit | Use prepare_upload + capability-URL data plane |
get_binary_resource returns 10 MB cap error | File larger than 10 MB | Make the file smaller |
Frequently Asked Questions
- Q: Can I use the same token for multiple agents?
- A: Yes, but we recommend one token per agent so you can revoke independently.
- Q: Does the agent see my password?
- A: Never. PATs and OAuth tokens are independent credentials.
- Q: Can a token with
journeys:readsee private journeys? - A: Only if you are a viewer/contributor/creator of that journey and the token’s journey restriction allows it.
- Q: What happens when I revoke a token?
- A: Immediate — the token stops working. Your browser sessions are unaffected.
- Q: Can I use MCP from a local script (curl, Python)?
- A: Yes —
POST https://wewent.to/api/mcpwithAuthorization: Bearer wwt_pat_…and JSON-RPC 2.0 body. - Q: Why does
search_journeysreturn max 200 results? - A: To avoid overwhelming the agent with data, search_journeys implements a capped keyset-cursor pagination. Cursor-walk via
modifiedFrom/modifiedTowith sortrecentto page further.
19. Manage Connected Apps
The Connected Apps page (/account/connected-apps) lists every OAuth 2.1 client you have authorized to access your wewent.to data via the MCP server. Each entry shows the client name, the date you granted access, the scopes you approved, and any journey restriction you selected.
You can revoke an app at any time. Revoking immediately invalidates both the access token and its refresh token pair, and the app can no longer call the MCP endpoint on your behalf. Revoking never affects your browser sessions or your account.
How to revoke:
- Open Account Settings → Connected Apps.
- Find the app you want to remove.
- Click Revoke and confirm.
20. Manage Connected Accounts
The Connected Accounts page (/account/connections) manages external service linkages — currently only Google Drive. When you import photos or GPX tracks from Google Drive, wewent.to stores an encrypted refresh token so future imports work without re-authenticating.
Each connection shows its status:
- Connected — the linkage is active and imports will work.
- Reconnect required — the refresh token expired or was revoked at Google; click Reconnect to restore access.
To disconnect Google Drive: click Revoke on the Connected Accounts page. This deletes the encrypted credential from wewent.to. You can reconnect later by starting a new Google Drive import from any journey.